
How to Build a Zoom Meeting Bot: Step-by-Step with Code

You can build a Zoom meeting bot with a single API call that handles joining the meeting, capturing media, and streaming data back to your application. This approach avoids the complexity of managing browser automation or the lengthy review process of the native Zoom Meeting SDK, letting you focus on your application's features instead of low-level infrastructure.
Building a bot that can reliably join any Zoom meeting is harder than it looks. The official SDK requires a feature review that can take weeks before your app can join external meetings. The alternative, scripting a headless browser, is brittle and requires constant maintenance as Zoom updates its web client's UI selectors. Both paths force you to manage the complex, real-time infrastructure for processing raw audio and video streams.
A dedicated meeting bot API provides a stable, documented interface for this entire process. It manages a fleet of bots ready to deploy, handles the connection and authentication with Zoom, and provides clean, structured data like transcripts and speaker events through simple webhooks. This turns a multi-month infrastructure project into a single API integration.
This tutorial walks through building a Zoom meeting bot using an API. We will cover how to make a bot join a meeting with a POST request, listen for events, and get the full meeting transcript after the call ends.
Why Building a Zoom Bot From Scratch is Hard
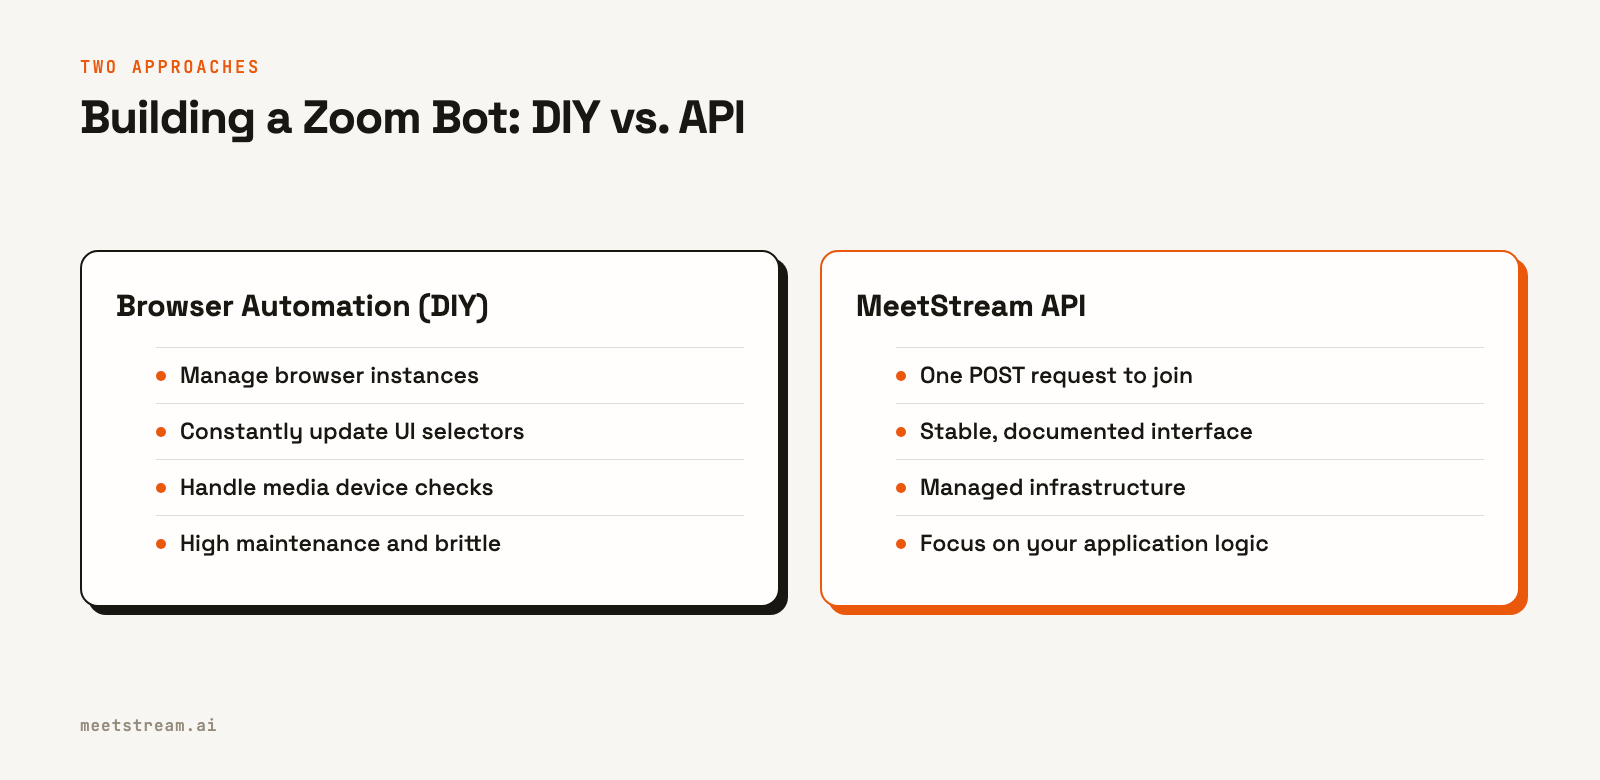
Developers trying to get programmatic access to a Zoom meeting typically face two options: the official SDK or browser automation. Both present significant challenges, especially when building a reliable product.
The Zoom Meeting SDK provides deep access to the meeting environment. However, it comes with considerable overhead. To join meetings hosted by other organizations, your app must be published on the Zoom App Marketplace, which involves a security and feature review that can take four to six weeks. You are also responsible for managing the bot's connection, capturing raw media streams, and piping that data to a separate service for transcription or analysis. This requires significant work in real-time media processing.
The other common path is browser automation using tools like Playwright or Puppeteer. This approach scripts a headless browser to navigate to the Zoom web client, enter a name, and join the meeting just like a human user. While this can work for a simple proof of concept, it is notoriously brittle in production. Zoom can change its UI, CSS selectors, and join flow at any time, breaking your bot without warning. These bots also have to contend with media device checks, waiting rooms, and pop-ups, adding layers of complexity to the automation script.
The Architecture of an API-First Zoom Bot
A meeting bot API provides a layer of abstraction over this complexity. Instead of building and maintaining the connection logic yourself, you interact with a simple REST API.
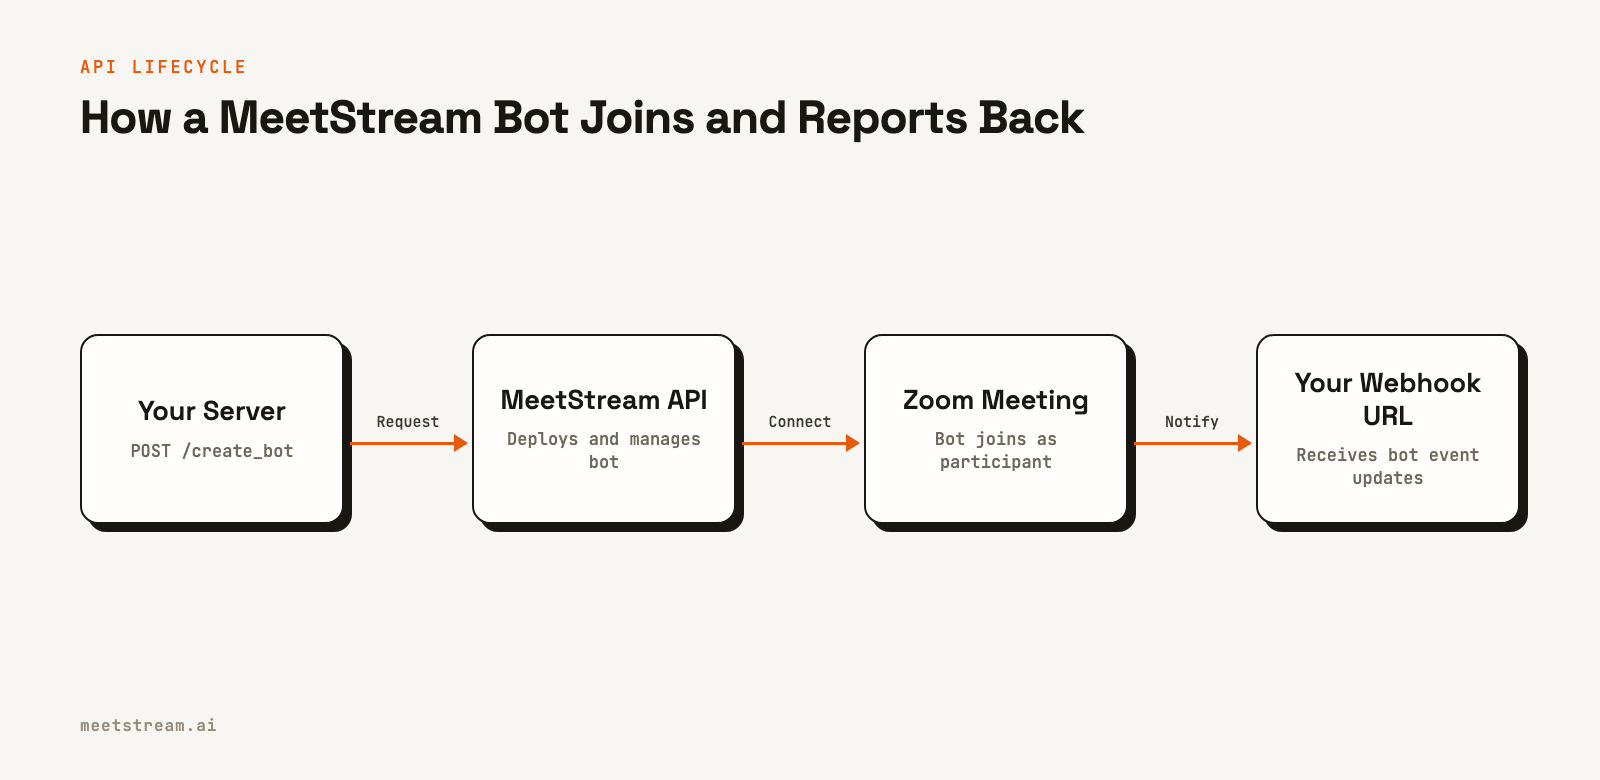
Here's how it works. Your application makes a single API call to an endpoint, passing the Zoom meeting URL and a name for your bot. The API service then deploys a pre-warmed bot instance from its own infrastructure pool. This bot handles the entire process of joining the meeting, including navigating any pre-join screens or waiting rooms.
Once inside the meeting, the bot establishes a connection to capture audio and video. It can then stream this data in real time or process it after the meeting concludes. Status updates, like when the bot successfully joins or when the meeting ends, are sent to your application via webhooks. This event-driven model means you do not need to poll for status. You simply provide a URL and listen for incoming HTTP POST requests from the API.
Step 1: Get Your API Key
First, you need an API key to authenticate your requests. You can get one from the MeetStream dashboard after signing up. All API requests must include this key in an `Authorization` header.
Keep your API key secure and treat it like a password. It is best to store it in an environment variable rather than hardcoding it in your application.
export MEETSTREAM_API_KEY="YOUR_API_KEY"Step 2: Join a Meeting with a POST Request
To make a bot join a Zoom meeting, you send a POST request to the /bots/create_bot endpoint. The only required fields are the meeting_link and a bot_name.
In this example, we also include a callback_url to receive webhook events and a recording_config to request a transcript after the call using MeetStream's native provider.
curl -X POST "https://api.meetstream.ai/api/v1/bots/create_bot" \
  -H "Authorization: Token <YOUR_API_KEY>" \
  -H "Content-Type: application/json" \
  -d '{
    "meeting_link": "https://us06web.zoom.us/j/1234567890?pwd=...",
    "bot_name": "Notetaker Bot",
    "callback_url": "https://your-app.com/webhooks/meetstream",
    "recording_config": {
      "transcript": {
        "provider": {
          "meetstream": {}
        }
      }
    }
  }'
The API will respond immediately with a 201 Created status and a JSON body containing the unique bot_id. You should store this ID to associate incoming webhooks with the correct session.
{
  "bot_id": "604c0a0b-973d-4eb1-a5bf-2c7513f6bbe0",
  "transcript_id": "a7e1b2c3-d4e5-f6a7-b8c9-d0e1f2a3b4c5",
  "meeting_url": "https://us06web.zoom.us/j/1234567890?pwd=...",
  "status": "Active"
}
Step 3: Handle Bot Events with Webhooks
Once the bot is deployed, the API will send POST requests to the callback_url you provided. Your application should have an endpoint ready to receive these events. Always respond with a 2xx status code quickly to acknowledge receipt.
Each webhook payload contains a bot_event field that tells you what happened. For a basic notetaker, you will want to handle a few key events.
bot.inmeeting: Fired once the bot has successfully joined the meeting and is capturing media.bot.stopped: A terminal event fired when the bot has left the meeting for any reason.transcription.processed: Fired when the post-call transcript is ready for download.bot.failed: Fired if the bot fails to join the meeting, with details in themessagefield.
A typical payload for the bot.inmeeting event looks like this:
{
  "bot_event": "bot.inmeeting",
  "bot_id": "604c0a0b-973d-4eb1-a5bf-2c7513f6bbe0",
  "bot_status": "InMeeting",
  "message": "Bot joined the meeting",
  "status_code": 200,
  "timestamp": "2026-02-27T07:11:51+00:00",
  "custom_attributes": {}
}
Your webhook handler should parse the JSON and use the bot_event to trigger the appropriate logic in your application, such as updating a status in your database.
Step 4: Get the Transcript Data
When you receive the transcription.processed webhook, you can fetch the full, speaker-diarized transcript. Use the transcript_id returned in the initial create_bot response to make a GET request to the /transcript/{transcript_id}/get_transcript endpoint.
curl -X GET "https://api.meetstream.ai/api/v1/transcript/a7e1b2c3-d4e5.../get_transcript" \
  -H "Authorization: Token <YOUR_API_KEY>"
The response will be a JSON object containing the full transcript text, along with an array of utterances, each with a speaker, start and end time, and confidence score. You can use this structured data to build summaries, extract action items, or feed into a meeting analytics dashboard.
What to Watch Out For
Building on top of Zoom involves a few platform-specific details. A few things to keep in mind:
Authentication: Since March 2026, Zoom requires bots joining via the SDK to use an On-Behalf-Of (OBF) token. This means a user who has authorized your Zoom App must be in the meeting for the bot to join. MeetStream handles the token fetch for you, but you still need to set up a Zoom App and an OAuth flow on your side. You pass the URL to fetch the token in the create_bot call.
Waiting Rooms: If a meeting has a waiting room enabled, your bot will be placed there until admitted by the host. The API will send a bot.in_waiting_room webhook, and you can configure timeouts in case the bot is never admitted.
Host Permissions: For a bot to record, the meeting host must grant permission. If permission is denied, you will receive a bot.recording_permission_denied event. It is important to handle this state gracefully in your application's UI.
How MeetStream Fits In
MeetStream is designed to be the agent-first voice infrastructure for meetings. While this guide focuses on a passive transcription bot, the same API is the foundation for building interactive AI voice agents that can listen, speak, and act during a live call. The platform provides real-time audio streams and control endpoints for sending text-to-speech (TTS) audio back into the meeting.
The API is also platform-agnostic. The exact same create_bot request shown here works for Google Meet and Microsoft Teams. You just change the meeting_link. This allows you to build a single integration that supports all three major platforms, saving months of separate development and maintenance work.
Conclusion
Building a reliable Zoom meeting bot does not require wrestling with brittle browser automation or complex SDKs. By using a dedicated meeting bot API, you can offload the infrastructure management and focus on creating value for your users. A single POST request is all it takes to get a bot into a call, and webhooks provide the real-time events and post-call data needed to power your application.
This API-first approach is the foundation for everything from simple notetakers to sophisticated AI agents that participate in conversations. See the full API reference at docs.meetstream.ai.
Frequently Asked Questions
How do I make a bot for Zoom?
The most reliable way to make a bot for Zoom is to use a third-party meeting bot API. This lets you send a bot into any Zoom call with a single API request, avoiding the need for complex browser automation or the lengthy Zoom SDK review process.
Does Zoom have a bot API?
Zoom has a Meeting SDK that allows developers to build applications that interact with meetings, but it is not a simple bot API. Using the SDK to have a bot join external meetings requires a multi-week app review process. For a simpler integration, developers often use a unified meeting bot API.
Can a bot join a password-protected Zoom meeting?
Yes. When using a meeting bot API, you provide the full meeting URL, which includes the embedded password. The API service handles passing the password during the join flow so the bot can enter the meeting automatically.
How do I get a transcript from a Zoom meeting using an API?
You can get a transcript by sending a bot into the meeting to capture the audio. A Zoom transcription API can deploy a bot, record the conversation, process the audio through a speech-to-text engine, and return a speaker-labeled transcript.
Can a Zoom bot work with other platforms like Google Meet?
A bot built specifically with the Zoom SDK will only work for Zoom. However, if you build using a unified API like MeetStream, the same integration can be used to deploy bots into Zoom, Google Meet, and Microsoft Teams by simply changing the meeting link in the API call.