
Capture System Audio for Recording: Loopback on Windows, macOS and Linux
Learn how to capture system audio for meeting recording with loopback devices, why it breaks at scale, and the managed bot-stream alternative.

You wired up a recorder, tested it on a Zoom call, and got a clean audio file. It sounded perfect on your laptop. Then you deployed it to a server with no sound card, the file came back silent, and you realized "capture system audio" means something completely different once there is no physical speaker for the audio to come out of. This is a common problem for developers building products that record meetings.
The need to capture system audio arises because meeting audio is an output, not an input. Your operating system mixes every participant's voice into a single stream destined for your speakers. To record it, you have to intercept that stream. On a local desktop, this is a solved problem. When you need to record many concurrent meetings on headless infrastructure, the local approach starts to break down.
This happens because local tools assume a desktop environment with a user, a screen, and a sound card. Server-side recording has none of these. The core challenge shifts from capturing audio to building and maintaining a fleet of virtual desktops just to create an audio stream to capture. This is where agent-first voice infrastructure like MeetStream provides a different path, by sending an AI participant into the meeting to capture audio at the source.
This article walks through both approaches. First, we will cover the specifics of setting up local loopback devices for macOS, Windows, and Linux. Then, we will look at the API-driven alternative, where a hosted bot joins the call and streams audio directly to your application, no virtual sound card required. Let's get into it.
Why Capturing System Audio Is Complex
The confusion around this topic comes from a fundamental OS design choice. Microphones are input devices, exposed directly for any application to read. System audio is an output, a final mix of all playing sounds sent to a physical device like speakers or headphones. There is no built-in input that reads this mixed output back into the system, because for most of computing history, users did not need to record what their speakers were playing.
A loopback device closes that gap. It is a piece of software that acts as a virtual sound card, presenting the system's final audio output as if it were a microphone input. You tell your OS to send audio to the loopback device, then you tell your recording software to listen to that same device. This creates a clean bridge for you to capture system audio.
This works well on a single machine. The problems begin when you build a product on this foundation. The loopback approach assumes a real audio session is playing, that you control the machine, and that a single mixed stream is good enough. For recording your own meetings on your own laptop, these assumptions hold. For a SaaS product that records customer meetings, they do not.
The Local Approach: Loopback Capture by OS
Here is a practical guide to capturing system audio on each major platform. These are stable, well-understood methods. Installation steps for third-party tools can change, so focus on the tool names and the underlying concepts.
macOS
By design, macOS prevents applications from recording system output directly. The standard solution is to install a virtual audio driver that exposes system output as an input device. BlackHole is a popular free, open-source option, while Rogue Amoeba's Loopback is a powerful paid alternative.
With either tool, the process is similar. You create a Multi-Output Device in the Audio MIDI Setup utility. This sends audio to both your real speakers and the virtual device, so you can still hear the call. Then, you configure your recording application to use the virtual device as its input. Using ffmpeg with BlackHole installed, the commands look like this:
# List available audio devices to find the index of "BlackHole 2ch"
ffmpeg -f avfoundation -list_devices true -i ""

# Record system audio from the BlackHole virtual device (e.g., index 2)
ffmpeg -f avfoundation -i ":2" -ac 2 -ar 48000 system_audio.wav
The :2 argument specifies audio input at index 2, with no video. If you route all system output only to BlackHole, your own speakers will be silent. The Multi-Output Device is the key to hearing and recording at the same time.
Windows
Windows is the most direct of the three platforms because its audio API, WASAPI, has a built-in loopback mode. You can capture the audio render endpoint without a third-party driver. The ffmpeg tool can access this directly, making it simple to capture system audio.
# Capture the default playback device using WASAPI loopback
ffmpeg -f wasapi -i default -ac 2 -ar 48000 system_audio.wav
This command grabs exactly what is being sent to the default speakers. For more isolation, you can use a virtual audio cable driver to route a specific application's output to a dedicated virtual device and record from that device instead.
Linux
On Linux, both the PulseAudio and the newer PipeWire sound servers expose a "monitor" source for every output sink. This monitor is the loopback: it is a readable input source that mirrors whatever the corresponding sink is playing. This is highly scriptable and the most common method for server-side recording projects.
# Find the monitor source for your default output sink
pactl list sources short | grep monitor

# Record from that monitor source
ffmpeg -f pulse -i alsa_output.pci-0000_00_1f.3.analog-stereo.monitor \
  -ac 2 -ar 48000 system_audio.wav
This is how many teams build recording bots for platforms like Zoom or Google Meet. They run a virtual sound server with a null sink in a headless container, launch a browser to join the meeting, and then capture system audio from the null sink's monitor. It works, but it means you are now responsible for maintaining that entire stack.
Where the Loopback Model Breaks Down
The methods above will get you a recording. The model breaks when you need to record thousands of meetings reliably on a server, with speaker labels. Four specific problems emerge.
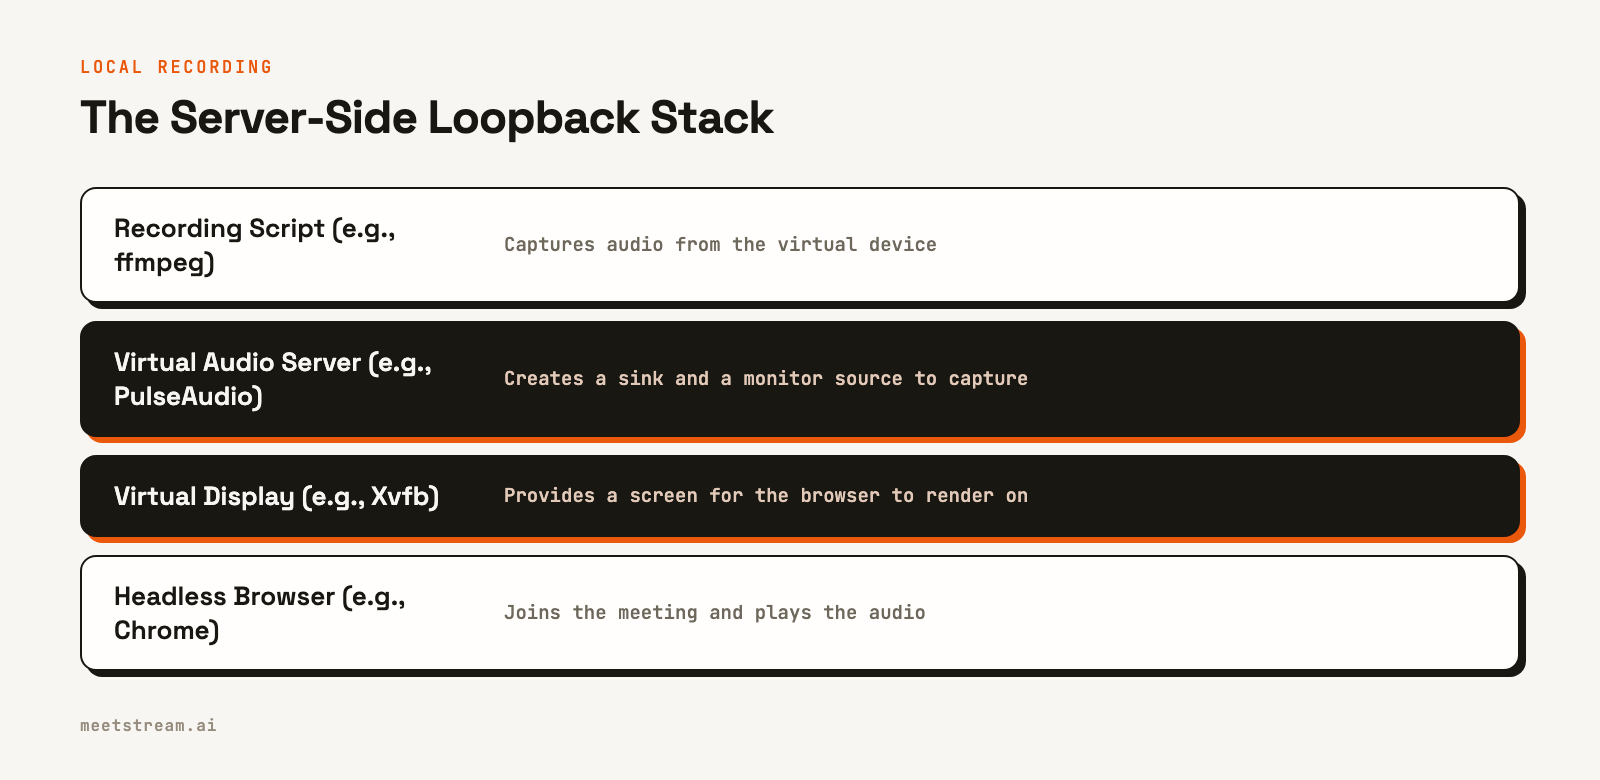
First, headless servers have no audio session. A cloud VM lacks a sound card and has nothing playing. To make loopback capture work, you must run a full virtual audio server, a headless browser, and a virtual display for every concurrent meeting. You are now operating a fleet of fake desktops. This is the single largest hidden cost of this approach.
Second, system audio is a single, mixed stream. The OS gives you one output with every speaker's voice combined. This is a significant problem for accurate transcription. The process of identifying who said what, known as diarization, is far more difficult on a pre-mixed stream than with speaker-attributed audio. We explore this in our guide to multi-speaker transcription.
Third, you capture everything else that is playing. A loopback device grabs the final mixed output, so a system notification or audio from another application will end up in your meeting recording. Isolating a single application's audio adds another layer of complexity.
Fourth, you own all platform maintenance. Zoom, Google Meet, and Microsoft Teams update their join flows and audio handling constantly. When a UI change breaks your headless automation, your capture process can silently produce empty files until you notice and fix it. For a product built on recording, this is a critical reliability risk.
The API Approach: A Bot That Streams Audio
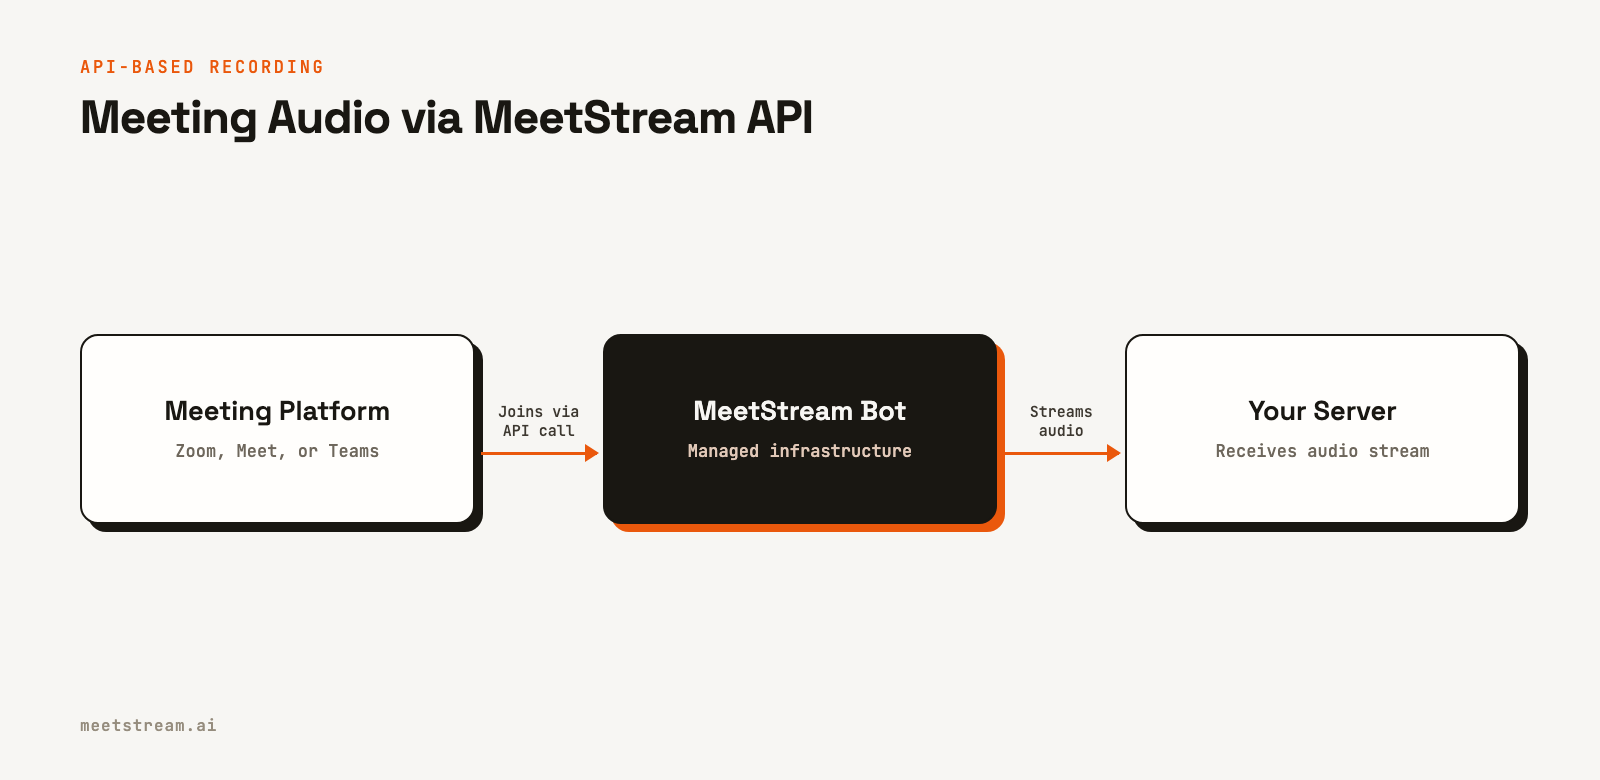
The alternative is to stop trying to capture system audio from a client machine and instead use a server-side bot to join the meeting and send you the audio. A meeting bot API provides this service. There is no virtual sound device, no headless desktop, and no OS-specific setup, because the bot runs the capture on managed infrastructure and delivers the audio over the network.
With MeetStream, you make one API request with a meeting link and a WebSocket URL you control. A bot joins the call, connects to your WebSocket endpoint as a client, and streams raw audio to you in real time.
curl -X POST "https://api.meetstream.ai/api/v1/bots/create_bot" \
  -H "Authorization: Token <YOUR_API_KEY>" \
  -H "Content-Type: application/json" \
  -d '{
    "meeting_link": "<YOUR_MEETING_LINK>",
    "bot_name": "Recorder",
    "live_audio_required": { "websocket_url": "wss://your-app.com/audio" }
  }'
The API responds with a bot_id. MeetStream then connects to your WebSocket and pushes binary audio frames. Each frame is tagged with the dominant speaker, providing attribution that a raw loopback capture cannot. The frame format is a one-byte message type, a length-prefixed speaker_id, a length-prefixed speaker_name, and then raw PCM int16 little-endian audio samples at 48kHz mono. You can find more details in the real-time audio streaming docs.
A minimal Python WebSocket server to receive and save this audio looks like this:
import asyncio
import websockets

async def handler(websocket):
    with open("meeting_audio.pcm", "ab") as f:
        async for message in websocket:
            # message[0] is msg_type (1 byte)
            offset = 1
            # speaker_id is length-prefixed (2 bytes, little-endian)
            id_len = int.from_bytes(message[offset:offset+2], "little")
            offset += 2 + id_len
            # speaker_name is length-prefixed (2 bytes, little-endian)
            name_len = int.from_bytes(message[offset:offset+2], "little")
            offset += 2 + name_len
            # The rest is raw PCM audio data
            f.write(message[offset:])

async def main():
    async with websockets.serve(handler, "0.0.0.0", 8080):
        await asyncio.Future()

if __name__ == "__main__":
    asyncio.run(main())
This code records meeting audio without a sound card, a virtual device, or a headless browser in your stack. The same API call works for Zoom, Google Meet, and Microsoft Teams. If you need a transcript instead of raw audio, you can request live transcription to a webhook and receive structured text with speaker labels as the meeting happens.
How MeetStream Fits In
MeetStream provides a single API for deploying bots into Zoom, Google Meet, and Microsoft Teams. When you need to capture system audio for meetings at scale, our platform is a direct replacement for the entire loopback and headless browser stack. You pass a meeting link and get back a speaker-attributed audio stream over a WebSocket or a finished recording and transcript after the call.
Because the bot is a true participant, it can do more than just record. It can stream video, read and post chat messages, and even speak back into the call when connected to an AI voice agent. This agent-first approach treats audio capture as one capability of an active in-meeting participant, not just a passive recording. For developers building products on top of meetings, this provides a more flexible and reliable foundation than local capture methods.
Conclusion
Choosing how to capture system audio depends entirely on your use case. For recording on a local machine you control, a loopback or virtual audio device is the right tool. It is well-understood and effective for personal or small-scale use on any major operating system.
If you are building a product that records customer meetings on a server, the loopback path introduces significant infrastructure and reliability challenges. At that point, a managed bot that joins the call and streams speaker-attributed audio is the more scalable approach. It replaces a complex, brittle stack with a single API call. If that is the path you are on, you can get started free at meetstream.ai.
Frequently Asked Questions
How do I capture system audio for meeting recording?
On a local machine, use a virtual loopback device to route system output to a recordable input. On a server, this approach is complex. A better method is to use a meeting bot API like MeetStream to have a bot join the call and stream the audio directly to your application.
Why is my system audio recording silent on a server?
A headless server typically has no sound card or active audio session, so there is no audio for a loopback device to capture. To make it work, you must run a virtual audio server and a headless browser to generate the audio stream, or use a bot-based API that handles capture externally.
Can I record system audio without installing extra software?
On Windows, the built-in WASAPI audio driver supports loopback mode without third-party software. On macOS, you almost always need a virtual audio driver like BlackHole. On Linux, the monitor source feature is built into the standard PulseAudio and PipeWire sound servers.
Does loopback capture separate each speaker's audio?
No. A loopback device captures the final, mixed system audio as a single stream. To get separate or speaker-attributed audio, you need a tool that can access the meeting's audio before it gets mixed, which is what a real-time meeting API like MeetStream provides.


